Showing posts with label vegetable. Show all posts

Thursday, July 13, 2023

Cucumber salad with sour cream dressing

 5 small salad cucumbers
1 small white onion
1 Tbsp table salt
1/4 cup sour cream
1 tsp white wine vinegar 
2 Tbsp fresh dill, chopped
Pepper to taste

Using a mandolin, slice cucumbers about 1/8-1/4 inch thick into a glass bowl. Slice onion into smaller pieces. Sprinkle onion and cucumber with salt and transfer to a mesh colander. Allow to drain over bowl for at least 1 hour and up to two hours. 

Drain cucumbers on paper towels to remove as much liquid as possible. Set aside in clean and drained out glass bowl until ready to eat. Drain cucumbers if liquid settles on bottom of bowl. 

Mix sour cream, vinegar, dill and pepper in a small dish. Place in refrigerator until ready to eat. 

Just before eating, combine dressing with cucumber. Mix thoroughly to cover all the cucumbers. Sour cream May foam a little. If too thick add a little more vinegar. If too thin add a little more sour cream. 

Serve with your favorite summertime entree. 

Monday, October 18, 2021

Twenty Tap Style Roasted Brussels Sprouts


1 pound Brussels sprouts, trimmed, washed, and halved
2-3 Tablespoons oil
Salt and pepper 
2-3 oz crumbled goat cheese
3+ Tablespoons spicy harissa
2 oz pistachios, shelled, and lightly chopped
1-2 cups arugula 
1/4 cup shredded Manchego cheese

Preheat oven to 400 degrees. Toss Brussels sprouts with oil and salt and pepper and spread on a baking sheet into a single layer. Roast turning once for 20-30 minutes depending on the size of sprouts. They should be crispy but not burnt.

Toss Brussels sprouts with harissa until well coated (May use any spice level, but I like spicy harissa.), adding more if needed. Return to oven for 2 minutes. 

Place Brussels sprouts in a serving bowl, adding goat cheese in layers. Add arugula and pistachios and toss sprouts lightly. Shred Manchego cheese over the top of everything and serve immediately! 

These are one of the best appetizers at Twenty Tap located in Broadripple in Indianapolis. Try it, you’ll love it! 

Tuesday, March 30, 2021

Guilt-Free Roasted Potatoes


 I got this recipe from my favorite sister (wink wink), Melissa Stabb. These are delicious and so very easy to make.

4 large baking potatoes (about 6 oz each)
1/2 cup grated Parmesan Cheese (not shredded) - I use Trader Joe's
1 tsp dried basil, crumbled
1 1/4 tsp seasoned salt
1/2 tsp garlic powder
1/2 tsp onion powder
Freshly ground black pepper
Vegetable spray

Spray a large (18x13 inches) metal sheet pan with vegetable spray and set aside. Wash and scrub potatoes, do no peel. Cut each potato in 4-6 wedges (length-wise) and set aside.

Combine the Parmesan cheese and spices on a paper plate. Mix thoroughly. Press each potato wedge (both cut sides) into the Parmesan cheese mixture and place on the sheet pan, cut side down. This may be difficult, but press as much as you can into the potato wedge. Place any leftover Parmesan cheese on top of wedges that look a little less coated. You should not have much, if any lelftover. Spray tops of potatoes lightly with more vegetable spray.
 

Roast in a preheated 350 degree oven for 30 minutes. Remove pan from oven and carefully lift and turn every potato wedge over so the exposed slice is against the baking sheet. Bake 30 more minutes or until potatoes are golden brown and crunchy.

Place on a warm platter and serve immediately.

Makes 4 servings.

These are crunchy and taste like deep-fried potato wedges without the guilt. I imagine you could also do these in an air-fryer, but I don't have one, so if you try it that way, leave a comment below!

Tuesday, November 17, 2020

Pickled carrots and Daikon


 For Buddah bowls and Bahn Mi sandwiches or anything else you enjoy having with these or just eat them right out of the jar!

1 pint carrots, julienned or shredded
1 pint daikon radishes, julienned or shredded
1/2 c. white vinegar
1/2 c. rice wine vinegar
1/4 cup sugar
1 tsp kosher salt

Stuff carrots and daikon into clean mason jars -- you can use small amounts of each if you want.

Combine vinegars, sugar and salt into a saucepan and heat just until sugar and salt are dissolved, but not boiling. Pour liquid into jars of filled veggies. Place cover loosely on each jar or cover with plastic wrap with a rubber band.

Refrigerate for at least 4 hours or until veggies are cold and pickled. Keeps for up to a month in the refrigerator, but I advise you eat them up within 2-3 weeks.

Wednesday, July 29, 2020

Dilly Potato Salad


This gets better when it is chilled and marinates the potatoes.

2 pounds small Yukon Gold potatoes (whole)
4 hard-boiled eggs
1/2 cup green onions (including tops), thinly sliced
3 heaping Tbsp fresh dillweed, chopped
1 tsp. kosher salt
1 tsp freshly ground black pepper

Dressing
3/4 c. mayonnaise
1/4 cup milk
1 tsp white wine vinegar
1 tsp Dijon mustard

Boil potatoes until just tender. Cool under water and drain (inside of potato will still be warm). Cut potatoes into a small dice (leave peels on, but you can peel the potatoes if you don't like the peels). Chop up eggs. Place potatoes, eggs, onions, dill in a large glass bowl. Sprinkle with salt and pepper.

Mix all dressing ingredients in a separate bowl until well-blended. Add more milk so that the dressing is pourable. Pour dressing over the salad and gently stir to mix ingredients.

Refrigerate potato salad for at least an hour. Dressing will thicken as it cools. Be sure the salad is cold before serving.

Great leftover. Makes enough for about 6 servings.

Monday, June 8, 2020

Vinegar (not creamy) Coleslaw

1/2 head (about 10 cups) green cabbage shredded ( or 16 oz.bag)
1/2 small head (1-2 cups) purple cabbage shredded
2-3 larger carrots shredded
2-3 green onions, thinly sliced (with green tops)

1/4 cup apple cider vinegar
1 Tbsp Dijon mustard
2 tsp honey
1/2 tsp celery seed
1/4 cup canola oil
1 tsp kosher salt
1/2 tsp freshly ground black pepper

Mix the vegetables in a very large bowl. Whisk dressing ingredients together. About 15 minutes before eating, toss the dressing with the veggies and mix well.

This coleslaw tastes great (and crunchy) even if it sits in the dressing for awhile. It tastes good leftover and will last 4-5 days in the refrigerator.

This is the best vinegar-based recipe I've made.

Friday, April 10, 2020

Green beans with kale and tomatoes

1-2 Tbsp. olive oil
3 garlic cloves, minced
1 lb green beans, snapped in half
1/4 cup chicken or vegetable broth or white wine
1 bunch lacinato kale, stripped from stems and cut into ribbons
1/2 tsp chili pepper flakes
10-12 oz grape tomatoes, cut in half
juice of 1/2 lemon (about 2 Tbsp)
Salt and pepper to taste
1/4 cup grated Parmesan cheese

Heat oil in a large skillet. Add garlic and cook for 30 seconds. Add green beans and stir for 2 minute to keep green beans moving so they don't burn. Add broth or wine and cook over medium heat until green beans are almost done (about 5 minutes). Add kale and chili pepper and stir to mix completely. Cook an additional 3-4 minutes or until the kale is wilted and beans are tender crisp or cooked to desired doneness. Add grape tomatoes and lemon juice and stir. Season with salt and pepper. Top with grated Parmesan cheese and remove from heat, stirring slightly to mix in the cheese. Adjust seasoning and serve.

Friday, November 15, 2019

Green Bean Salad With Walnuts, Fennel, and Goat Cheese

Love this salad.  Our neighbor, Susan Yeagy (Bennett) made this for us when we used to get together for Christmas Eve. I highly recommend it anytime, but it's a great holiday salad that will wow your guests!

Serves 8-10 people

Ingredients

1 1/2 Tbsp Dijon Mustard
2 Tbsp white wine vinegar
3/4 tsp kosher salt, plus more for the water
1/2 tsp freshly ground black pepper
1/3 c. extra-virgin olive oil
2 pounds fresh green beans, trimmed and cut into 1 inch or so pieces
1 small fennel bulb (1 1/4 - 1 1/2 cups) thinly sliced into half-moons
3/4 c. toasted walnuts, coarsely chopped
1 4 oz container crumbled goat cheese

Directions
  1. In a medium bowl, whisk together the mustard, vinegar, salt, and pepper. Gradually add the oil and whisk until emulsified. Set aside
  2. Bring a large saucepan of salted water to a boil. Add the green beans and cook just until tender (about 3-4 minutes), Drain and run cold water to cool them. Best to undercook them so they don't get mushy. set aside until you're ready to assemble.
  3. In a large bowl, toss the green beans, cut fennel, toasted walnuts together. Add the goat cheese and the dressing just before serving. Toss well.

Serve at room temperature or chilled. 


Thursday, August 1, 2019

Quick Pickles (Quickles)

Want to pickle something and eat it right away, well, here's your recipe!


1/2 cup apple cider vinegar
1/2 cup water
1 Tbsp sugar
1 tsp kosher salt
1/2 tsp crushed peppercorns
1 large clove garlic, minced
1 fresh dill blossom (or fresh dill leaves)
4 medium pickling cucumbers, sliced thinly on the diagonal
2-3 green onions, thinly sliced with some of the greens

Mix vinegar, water, sugar, salt, peppercorns, and garlic in a small saucepan. Bring to boil until sugar and salt dissolve. Add dill. Cool slightly in the refrigerator. Meanwhile, slice cucumbers and onions and place into a dish or clean canning jar with a lid. Pour cooled vinegar mixture over the cucumber and onions, making sure they are all submerged. Weight the cucumbers down if necessary.

Place in the refrigerator until ready to eat. You can eat right away or keep for a week (if they last that long). You can add more sugar for a sweeter version. You can also pickle any other veggies you like using this recipe. Keep refrigerated.


Thursday, July 25, 2019

Ratatouille


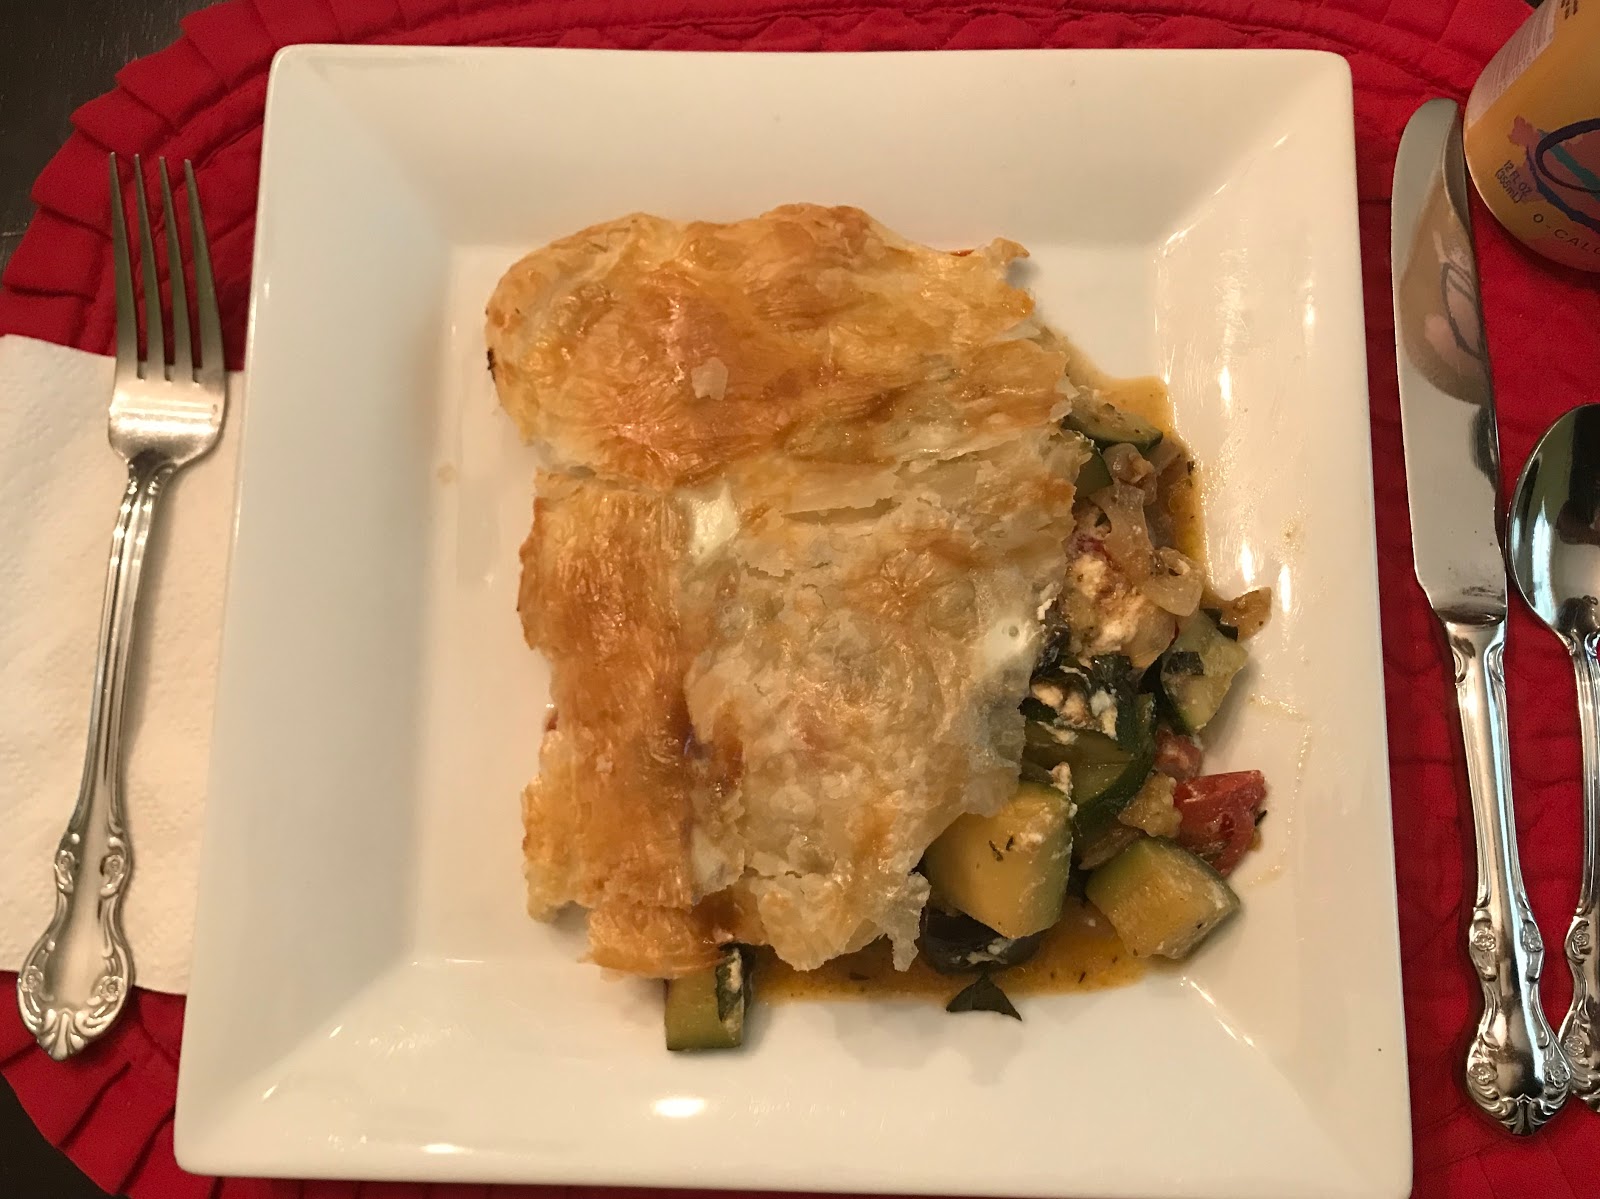
There are so many ways to make this dish. This is my favorite, but you can change it up easily. Don't worry about getting the "amount" of veggies or size of veggies right. This is one dish you can add more and it doesn't alter the taste. You can add or subtract herbs or replace them with fresh herbs (my favorite). This is also good for a main dish or a side dish to go along with a protein. The photos show how I made it into a main dish as a tart. I'll put what I did in a note at the bottom. Bottom line - make this dish and enjoy it while the summer and fall harvest is fresh. It tastes great hot or cold, so make it ahead and no need to even heat it before you eat it! Bon Appetit!

1 onion, sliced
3 large garlic cloves
2-3 Tbsp olive oil
3/4 pound eggplant, cut into 1 inch pieces (about 3-4 cups)
2 zucchini (medium), quartered lengthwise and cut into chunks
1 red bell pepper, chopped into squares
1/2 pound or 3/4 pound of ripe tomatoes (use whole or grape), chopped coarsely (about 1 1/2 cups)
1/2 -1 tsp dried oregano, crumbled
1/2 tsp dried thyme, crumbled
1/2 tsp ground coriander or cumin
1 tsp fennel seeds (use more or less to taste)
1/2 tsp red pepper flakes (optional)
1/2 cup shredded fresh basil leaves
Salt & pepper to taste

Salt eggplant cubes lightly and set in a colander to drain for 15 minutes or so. This will take some of the bitter taste out of the eggplant. Chop your other ingredients and prepare everything ahead while the eggplant is draining.

In a large skillet, heat 1 Tbsp olive oil over moderately low heat. Add onion and brown until softened, add the garlic and saute' until fragrant. Remove onion and garlic from the pan with a slotted spoon and set aside. Add remaining oil to the pan and turn up the heat to medium high. Add the eggplant and cook, stirring regularly, for about 5 minutes. Add the zucchini and pepper and stir fry an additional 3-4 minutes.

Once tender crisp, add the onion, garlic, tomatoes and herbs, except the fresh basil, to the pan. Salt and pepper lightly. Cook mixture on medium low, stirring frequently, for about 5-7 minutes or until vegetables are tender. Stir in the fresh basil and give it a good stir, cooking about 1 more minute.

Remove from heat and serve hot, cold, or at room temperature. This dish may also be made 1-2 days in advance, keeping it covered and chilled in the refrigerator.

Makes about 4 main dish servings, or 6-8 side servings.

NOTE: To make the tart, spread the hot ratatouille in a large glass dish, dot the top with fresh goat cheese. Then top with a puff pastry (homemade or one you buy at the store, following the instructions for thawing). Brush top of pastry with egg white and bake in a 400 degree oven for about 10-12 minutes.

Friday, September 7, 2018

Spicy Tofu Rice Bowl with Roasted Veggies and Peanut Drizzle

I love bowl meals! I created this using leftover veggies from my fridge, so you can use just about anything for the roasted veggies and it will be delicious. The peanut sauce is to die for! If you want additional sauce, double the recipe. Leftover sauce would make an awesome salad dressing.

Roasted Veggies
2 medium Garnet sweet potatoes (about a pound), cut into 1/2 inch chunks
1-2 sweet red peppers, cut into 1/2 inch chunks
1 sweet onion, cut into 1/2 inch chunks
3/4- 1 pound Brussels sprouts, cut in half
Cooking spray

Tofu
1 Pound extra firm Tofu
1/2 c. minced onions
2 green onions, chopped (tops included)
3 Tbsp cooking oil (I used grapeseed oil)
1 large garlic clove, minced
1 tsp sesame oil
1 Tbsp soy sauce
1 tsp salt
1 tsp sugar
1 Tbsp hot pepper flakes
1 Tbsp Mirin (rice) wine
1/2 cup water or vegetable broth

Peanut Sauce
2 Tbsp soy sauce
2 Tbsp maple syrup
2 Tbsp peanut butter
1 Tbsp sesame oil
2 tsp chili garlic hot sauce (we used Pepper Palace Ghostly Garlic)

2 cups cooked brown rice

Garnishes
Shredded carrots
Shredded daikon
sliced radishes
chopped cilantro
dry roasted peanuts

Heat oven to 425, place all the veggies on a large sheet pan and spray with cooking spray to coat. Salt and pepper as you desire. Roast veggies for about 20-25 minutes while preparing the rest of the meal.

Drain tofu paper towels. Cut tofu into quarter inch slices going the long way. Then cut each slice into thirds. You should have about 45 pieces of tofu. Make sure tofu is dry.

Heat oil in a large skillet and place tofu in a single layer. Fry on one side until it begins to get brown, then flip and brown the other side. Drain tofu on a paper towel. You may need to do this in two batches, but only use half the oil for each batch if you do.

Once the tofu is fried and drained, place the chopped onion, green onion, and garlic in the pan with the oil that's remaining. Cook the onion and garlic until it begins to brown.

In a separate bowl, mix 1 Tbsp soy sauce, salt, sugar, hot pepper flakes, wine and water or broth. Stir to dissolve the sugar. Add mixture to the pan, scraping up any bits of tofu left on the bottom of the pan. Bring to a boil and boil for a few minutes to thicken the sauce. Place the tofu back into the pan and stir to coat the tofu. Continue cooking on low heat until sauce is fairly thick and it sticks to the tofu.

Make the peanut sauce and place in a small bowl.

Now assemble your bowl by placing a half cup of rice, 1/4 of the roasted veggies, 1/4 of the tofu in a bowl. Add your garnishes (be liberal) and top with just a few peanuts. Then drizzle the peanut sauce all over everything.

Makes 4 generous helpings.  About 600 calories for each bowl.


Sunday, June 10, 2018

Harissa Sweet Potatoes

2 pounds (about 4) sweet potatoes (I used organic Garnet)
2 heaping tablespoons harissa (I used Trader Joe's brand)
2 Tbsp olive oil
Salt
Pepper
Juice from a half lemon

Cut sweet potatoes into chunks about an 3/4-1 inch with peel (you can also peel them if you prefer). Place in a large mixing bowl. Add the olive oil and harissa and mix well so each chunk is coated well.

Spray a large baking dish with a 1 inch height with cooling spray (I use pampered chef stoneware). Place sweet potatoes in a single layer on pan and generously salt and pepper the tops.

Bake at 425 degrees for about 25 minutes, flipping potatoes at least once. Potatoes should be brown and crispy, but not burned and soft in the inside when done.

Squeeze juice over the top of the potatoes and enjoy.

These are spicy, so use less harissa if you don't care for spice. The harissa mixed with the sweetness of the potatoes makes these a tasty balanced side dish with just about anything. I've made them with burgers, chicken, and they would be delicious with lamb (if you like lamb).


Wednesday, March 21, 2018

Mexican Street Corn Salad with Yogurt-Lime Dressing

4 cobs of sweet corn
1 Tbsp freshly squeezed lime juice
Salt and pepper
1 medium red bell pepper
1 can black beans, drained and rinsed
1/2 cup red onion, chopped
1/2 cup chopped cilantro
1 cup crumbled Mexican cheese (such as cotija or queso fresco), divided

Dressing
5 oz zero fat Greek yogurt
2 Tbsp Hellman's mayonnaise
1 small clove garlic, pressed
1 tsp honey
1 Tbsp lime juice
1/2 tsp smokey paprika
1/2 tsp ground cumin
1/4 tsp cayenne pepper

Heat oven to 400 degrees and place corn in oven with husks on. Roast about 20 minutes or until corn is soft, but still firm. Cool corn while you chop the ingredients for the rest of the salad. Cut corn off husks and place in a large bowl. Sprinkle with lime juice and salt and pepper. Add the red bell pepper, onion, black beans, cilantro and 3/4 cup of the Mexican cheese.

Mix all of the dressing ingredients together until smooth and creamy. Taste to adjust seasoning. If you want it more spicy, add additional cayenne pepper - if less spicy is your thing, don't add it at all.

Gently toss all of the salad ingredients together, pouring the dressing on top to incorporate. Top with 1/4 cup of additional cheese and refrigerate until ready to serve. This salad gets better as it blends and I like it cold, but it can be served at room temperature right away.

Eat as a side dish with enchiladas or tacos or just dig in and eat it as a "dip" with tortilla chips. This stuff is addicting!

NOTE: You can grill the corn, slightly charring it instead of roasting it in the oven. This will give the corn a smokey flavor and it will be a bit crispy.

NOTE: If you can't find Mexican cheese, you can substitute Feta cheese instead. Mexican cheese is much milder and has less salty flavor.

Sunday, July 16, 2017

It's Not Hard Being Green Veggie Machine


2 medium to large zucchini, spiralized
10 oz. package fresh English peas (from Trader Joe's)
1 Tbsp olive oil
2-3 cups broccoli (break into small tips and stems, if stems are peeled)
Parmesan cheese (optional)

Basil Sauce
1 cup packed fresh basil leaves
1 clove garlic
1/4 cup sweet onion, finely chopped
1 Tbsp lemon juice
1 Tbsp. red wine vinegar (or white wine vinegar)
1/2 tsp salt
4 or 5 grinds of pepper
1/4 cup olive oil

Make the basil sauce by placing all the ingredients into a food processor, except the olive oil. After everything is chopped, add the olive oil until incorporated. Remove from food processor. Should make about 1/2 cup. This can be made ahead.

Spiralize zucchini and set aside. You should have at least 6 cups of zucchini for this recipe.

Microwave peas until tender crisp (about 3-5 minutes), drain and set aside.

Heat 1 Tbsp. olive oil in a wok. Stir-fry the broccoli until tender-crisp. Add peas and stir-fry about 3-4 more minutes. Add the zucchini noodles and stir until noodles are just heated, but still tender-crisp. Do not over cook or zucchini will become mushy.

Remove from heat and pour on the basil Sauce. Stir well and place into a large serving dish. Top with Parmesan cheese, if desired.

Makes 5 generous helpings.

Zoodles with roasted tomatoes, garlic, onions, and mushrooms


3 medium zucchini, spiralized (if you don't have one, slice thinly)
10 oz. package of grape tomatoes (prefer heirloom)
3-4 medium garlic cloves, diced
1-2 Tbsp olive oil (or grapeseed oil)
1 medium onion, sliced in think wedges
12 oz box cremini mushrooms, sliced thinly
1/2 tsp red pepper flakes
1 tsp. oregano leaves, dried and crushed in your hand.
Salt and pepper to taste
10-12 fresh basil leaves, chiffonade

Heat oven to 450 degrees. In a small pan (I use a pampered chef mini bar pan), sprinkle about 1/2 Tbsp of oil on the tomatoes and garlic, salt and pepper and roast for about 10-15 minutes (until the tomatoes start to burst). Remove from oven to cool slightly.

Meanwhile, heat 1 Tbsp of oil in a large pan. Add onions and mushrooms and cook until tender crisp. Add red pepper flakes, oregano, and salt and pepper to taste. Add the tomato-garlic mixture and give it a good stir, popping the tomatoes to make a bit of a sauce.

Add the zoodles (zucchini noodles) and mix together making sure the zucchini is heated. Do not overcook the zucchini or it will become mushy. You just want to heat them until they are warm and tender crisp (about 2-3 minutes). Add more salt and pepper to taste.

Remove from pan and place into a serving dish. Top with chiffonade basil. If desired, top with a teaspoon of freshly-grated Parmesan cheese.

Serves 3. If you add a protein, this is all you need for a filling meal.

Calories: 150 (without cheese)

Friday, April 21, 2017

Cheesy (no soup) Hash Brown Potato Casserole


2-3 Tbsp butter
1 cup chopped onion
1/4 cup flour
1 tsp salt
1/2 tsp pepper
1/2 tsp dried thyme
12 oz chicken broth
1 cup milk
8 oz shredded sharp cheddar cheese (2 cups)
20 oz pkg Trader Joe's shredded hash brown potatoes, thawed
1/2 cup sour cream
2 Tbsp butter
1-2 cups Panko bread crumbs

Preheat oven to 350 degrees. Melt butter in a large pot. Cook onion until soft. Add salt, pepper and Thyme and then slowly stir in the flour until fully incorporated. Add broth and bring to a boil and stir until mixture is thickened. Add milk and stir thoroughly. Remove from burner and stir in the cheese until cheese is melted. Add shredded potatoes and mix well. Then stir in the sour cream until incorporated.

Spray a 9x11 inch glass pan with nonstick spray. Pour the potatoes into the pan and bake about 30 minutes. Meanwhile, melt butter and stir in panko breadcrumbs. Add crumbs to the top of the potatoes and continue baking until crumbs are browned and potatoes are bubbling (about 15 minutes). You might need to increase oven temperature to 425 degrees. Check to make sure potatoes are tender. Allow potatoes to rest about 10 minutes and serve warm.

This dish goes well with ham. You can also reheat the potatoes adding leftover ham to make a delicious second meal.

These potatoes are very forgiving. You can add more shredded potatoes--up to 28 oz and they will still be moist. Just make sure you have enough sauce to keep them moist!

Monday, April 11, 2016

Squash Medley

Simple side dish - perfect in the summer. You can make this with many different vegetables to change it up (example - add sliced tomatoes or grape tomatoes cuts in half)

2 garlic cloves, finely chopped
1 zucchini squash, sliced
1 yellow summer squash, sliced
1 red pepper, cut into thin strips
1/4 small purple onion, roughly chopped
1/4 c. sweet white onion, chopped
olive oil
8-10 basil leaves, sliced

Heat oil, add garlic for 20 seconds. Add squash and cook for about 5 minutes, Add the rest of the vegetables and stir fry until tender crisp. Add the fresh basil as garnish just before serving.

Wednesday, November 25, 2015

Sausage Stuffing in an Acorn Squash Container

2 whole acorn squash
1 tsp olive oil
1/2 pound pork sausage
1/2 tsp red pepper flakes
1/4 cup butter
1/2 large onion (about a cup), chopped
2 stalks of celery, chopped
3 cloves of garlic, minced 
1-2 tsp. chopped fresh rosemary
Salt and Pepper (to taste)
1 large red apple, chopped
1/2 cup chopped pecans
3/4 cup fine bread crumbs
1 cup grated Parmesan cheese

Heat oven to 400 degrees.

Chop a small slice off each end of the acorn squash, then cut them in half and take out the seeds. Stand the acorn squash on the flat side on a low-sided baking dish. Rub olive oil over the cut side of the squash and salt and pepper each half. Bake in the oven for about 30-40 minutes (depending on the size of the squash), just until tender crisp.

While squash is baking, brown the pork sausage in a large frying pan. Add red pepper flakes while it is frying unless you already are using a spicy sausage. Fry until pink is gone and drain sausage on paper towel to remove most of the grease.

Add butter to the pan and cook onion and celery until soft. Add the garlic, rosemary, salt and pepper until fragrant. Add back the sausage, then add the apple and pecans and stir well. Sprinkle the bread crumbs on top until mixed into the sausage. The mixture should begin to look like stuffing and begin to crisp up a bit. Add more butter or oil if it looks too dry. Turn off the heat and stir in 1/2 cup of the Parmesan cheese, reserving the rest.

Divide the sausage mixture equally into the 4 halves of the squash, mounding on top if necessary. Place back into the oven for  10-


15 minutes. Sprinkle the remaining Parmesan cheese on top of the squash-sausage and heat for 5 more minutes or until cheese is melted and top is browned and squash is soft.

Total baking time is between 50-60 minutes. You can pre-cook the squash in the microwave oven to shorten the baking time.


Saturday, February 21, 2015

Homemade Sauerkraut in a Quart Jar

I found this recipe on the Internet and couldn't believe how easy it was to make!


Give everything you use for this project a thorough cleaning, including your hands. It is imperative to keep jars and bowls free of dirt and germs!

You will need:

1 wide-mouth quart jar
1 large head of fresh green cabbage (about 2 pounds)
1 Tbsp. Kosher salt
1 large plastic or glass bowl
Cutting board and knife or a food processor or Mandolin that can slice cabbage
Cheesecloth or old flour-sack towel
Rubber band to secure the cloth or towel
A pint-size jelly jar that will fit inside the quart jar
Clean marbles or stones or something to weigh down the cabbage
Caraway seed (optional)

Clean the cabbage - remove any outer leaves that are wilted or hard. Cut the cabbage in quarters, then remove the core. Slice each wedge in half and then slice each wedge into very thin strips. Place the sliced cabbage in a large mixing bowl (use the biggest size you have).

Sprinkle the salt over the cabbage. It won't seem like much, but you don't want to over-salt it.  Let the cabbage and salt sit for about 5-10 minutes and get your canning jar ready and the pint-size jelly jar filled with the marbles or stones (put a lid on it for added safety). Cut your cheesecloth to fit over the quart-sized jar - leave lots of extra room since you will also need to fit it over the jelly jar that will sit atop the cabbage.

Begin working the salt into the cabbage by massaging and squeezing the cabbage with your hands. It may seem like there is not enough salt, but as you work the cabbage, it will become limp and more like coleslaw than cabbage. This will take 5-10 minutes. If you want to add caraway seed, do it now. I recommend 1/2 Tbsp to begin with (I added a tablespoon and it was too much).

Next pack the cabbage into the quart jar. If you have a canning funnel use it. If not, just use your hand and pack it, pushing down the cabbage to fit it all in the jar. Pour any liquid in the mixing bowl into the quart jar.

Now weigh the cabbage down with the marble or stone-filled jelly jar. Cover with the cheesecloth or a clean flour-sack cloth so that the cabbage can "breathe" but won't get dirty particles or dust in it.

Over the next 24 hours, press down the jelly jar to get the liquid above the cabbage. The cabbage should release liquid and what you want is to keep the liquid above the cabbage so it doesn't mold or spoil. Keep the jar on the kitchen counter overnight. After 24 hours, if there is not enough liquid, dissolve 1 tsp. salt with 1 cup of filtered water and add enough so the cabbage is fully submerged.

Continue to weigh down the cabbage and ferment 3-10 days. Because this is a small batch, it won't take as long as a large batch to begin its fermentation process. Ideally, you want the temperature of the room to be 65-75 degrees. Check daily and press down the cabbage to keep it submerged.

Begin tasting the cabbage after 3 days. The longer it is on the counter, the more fermented it will become. Don't be surprised if it begins to bubble or if a scum or foam appears on top. That is good. If you see mold, skim it off immediately and make sure the cabbage is fully submerged; don't eat the moldy parts close to the surface, but the rest of the sauerkraut is fine. Put a lid on the jar and just make sure the liquid stays above the cabbage. Here's a photo of it on my counter. This jar has caraway seeds added.


Once you have it at the level of sour you like, you can keep it for 2 months or longer in the refrigerator. It won't get a lot more fermented, but it will last at least that long. As long as it smells and tastes good, you can eat it! I doubt it will last even a month if your family is anything like mine!

You can also can your sauerkraut for longer storage outside of refrigeration, but canning does kill the good bacterias produced by the fermentation process. Feel free to use red cabbage or napa cabbage or other cabbages to make sauerkraut.

Happy fermentation!


Wednesday, November 26, 2014

Thanksgiving 2014

Two of the three Cantwell men...making good gravy!
Smoked cheddar and bleu cheese ball w/crackers
Bacon-wrapped Cornish Hens
Sourdough, sausage and roasted chestnut dressing
Parmesan-mascarpone mashed potatoes
Sweet potato casserole
Green bean salad with walnuts, fennel and goat cheese
Cranberry Compote
Pickles, olives, pickled beet tray
Pecan Pie

This year, Nathaniel, Joshua, David and I spent Thanksgiving Day together gathered around the bountiful blessings of God. The best part of Thanksgiving was realizing just how blessed I am to have a wonderful family and that we can all be together in a beautiful house we call home! We have so much to be thankful for! Most of all, I am thankful for Jesus, who not only has given me access to Him on a daily basis, but also who loves to bless me and my family with good things! Food, family, faith, fun -- all because Christ loves us! I must admit, I miss spending this day with my extended family like we used to do. Each of my siblings now celebrate amongst themselves - no more big gatherings like we used to do. "For everything there is a season....and a time for every purpose under heaven." Seasons come, seasons go, but the Word of the Lord endures forever.

Printfriendly